Showing posts with label Paleo. Show all posts

Saturday, 9 July 2016

Mixed Pickled Veggies

Pin It!


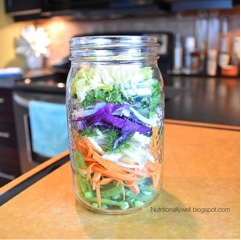
Part of my 4 days of home alone I made this recipe also inspired by Cookingwithplants.com. Anja had a guess chef named Ismail Tosun on her You Tube video making this. You can use any veggie combination you wish. The veggies originally used are listed below. This is what I had on hand and decided to use.

Ingredients

1/2 cup sugar peas
1/2 cup carrots
1/2 cup fennel
1/2 cup red cabbage
1/4 cup white onion
1/4 cup parsley
1/4 cup celery leaves
2 garlic cloves
( original recipe calls for radish, carrots, fennel, chilli, parsley & garlic )
**use organic when possible

Method

Slice, chop and/or julianne your veggies. 
Layer each veggie into a jar with a lid or a container. Set aside.


Marinade ingredients

2/3 cups of distilled white vinegar 
1/4 cup coconut sugar ( or one of your choice ) 
4 bay leaves
1/4 tsp of herb or spice of your choice ( original recipe calls for coriander seeds, I used herbamare )
1 tbsp 100% organic maple syrup 


Method 

Take all marinade ingredients and add them to a pot and heat just until the sugar is dissolved.
Pour into your container over the veggies. Seal the lid and give it a shake to toss the liquids around.
Set in the fridge for a day, tossing throughout the day. This will help all the veggies marinate equally.
Should last for about a week or more.


Serve on a sandwich, burger, wrap or serve as a side dish. The option is yours.


I really enjoyed this. I hope you do too!
Don't forget to check out Anja's website for some awesome recipes. Cookingwithplants.com

Monday, 30 May 2016

Corn & Carrot Cackers

Pin It!


I've been meaning to post more dehydrator recipes, but I as usual never write most of my recipes down. Part of the point of this blog was to create my own recipe book ( so to speak ). It's hard sometimes because I know what I want to make and I just start by grabbing ingredients and mixing it all up. That's the best and most fun for me. But then when I love something I made I can't ever master it again unless I do write it done. So here's one I loved!!! And wrote the recipe down. 

Ingredients:

1 cup carrots ( approx )
1 cup corn
1 cup kale ( as much as you can squish into the cup )
1/4 cup sun dried tomatoes ( in oil )
2 garlic cloves
1/2 tbsp fresh thyme
2 tbsp nutritional yeast
1/2 tsp salt
1/4 cup water ( filtered )
**use organic when possible


Method

Add all ingredients to your high speed blender ( I used my Vitamix ) and blend till the mx is puréed. 
Pour the mix onto your dehydrator sheet and spread it out evenly. At this point you can sprinkle with some additional toppings if you wish. I added a bit more salt, pepper, nutritional yeast and broccoli seed powder. The option is yours.
Dehydrate at 140 for approx 12 hours. 
Once done cut with a pizza cutter to the size and shape you desire.
I served mine up with some spinach artichoke dip. So yummy.
Enjoy!


Wednesday, 20 January 2016

Coconut Milk


How to make your own coconut milk. 


Ingredients 

1 cup unsweetened shredded coconut
2 cups hot or boiling water

Method

Place in a high speed blender ( I use my Vitamix )
Blend for about 2-3 minutes
Strain into a nut bag over a glass bowl and squeeze all the milk out until just the dry coconut pulp is left

** do not throw out this pulp as its great added to hot or cold meals. Add it to soups & curries or how about your smoothie or sprinkled on top of a salad. 


My favourite so far has been the combination of pulp from my cashew coconut milk. It is so delicious and naturally sweet from the cashews. 

FYI: Making nut milk is pretty much the same measurements. The only difference is soaking the nuts. Soak time differs from nut to nut though. 


Hope you enjoy! 


Thursday, 14 January 2016

Garlicky Mixed Greens Pesto

Pin It!
A raw & dairy free pesto full of detoxifying, anti-inflammatory, anti-bacterial properties and full of vitamins & minerals and essential fatty acid omega 3.


Ingredients

1 cup basil
1 cup parsley
1 cup kale
1 cup spinach 
1/2 cup walnuts
3 garlic cloves
1 tbsp lemon juice
1/4 tsp salt
1/4 cup extra virgin olive oil
** use organic when possible**
Yields approx 1/2 cup

Method

Add all ingredients to a food processer or mixer ( I used my mini KitchenAid ) and chop till the mix is fully incorporated. Add more oil if you prefer a looser texture.


Wednesday, 2 December 2015

Cauliflower Rice

Pin It!


Looking to cut down on your carb comsumption? Try substituting cauliflower for rice. Grated cauliflower has a very similar texture to rice. That's why this is an easy swap. You can eat it raw or cooked. Today I've cooked the cauliflower rice with the below ingredients.

Ingredients

1/2 head of cauliflower ( approx 4 cups )
1/2 small onion ( approx 1/3 cup )
1/2 tsp turmeric 
1 tsp curry powder
1/2 tsp salt
1/4 tsp red pepper flakes
1 cup canned lite coconut milk
**use organic when possible

Method

Heat a pan on medium-low heat.
Chop onion, add coconut oil or oil of your choice to the hot pan.
Sauté the onion till it becomes translucent.
Grate the cauliflower ( I used my mini kitchen aide )  
Add the cauliflower and the rest of the ingredients to the pan.
Stir to mix all the ingredients together.
Cook for about 10 minutes or until the coconut milk has absorbed. Stirring on and off to keep incorporating the coconut milk. 
Serve it as you would any rice dish, on its own or incorporate it into a wrap or salad. 
Hope you enjoy! 

Friday, 27 November 2015

Creamy & Spicy Cauliflower Soup

Pin It!


Chilly days bring warm soups and today's lunch was just that, using these below ingredients.

Ingredients

1 head of cauliflower
8 cloves of garlic
1 onion ( I used yellow but any is fine )
----------
1 can lite coconut milk
2 tbsp red curry thai paste ( start with 1 tbsp if you are not a spicy fan ) 
1/2 tsp salt
1 tsp ketcap manis
2 cups veggie stock
** use organic when possible 
Yields about 6-7 cups

Method

Heat oven to 400F 
Spray some olive oil onto a baking sheet and set it aside.
Cut the head of cauliflower into slices including stem but remove the leaves.
Cut onion in half leaving its peel on.
Cut hard bottoms off the garlic leaving its skin on. Don't worry if you forget about the bottoms. I just find it easier and quicker to pop the garlic out.
Place cauliflower onto the pan, try not to overlap and add the garlic and onion ( skin up ).
Bake for 25 minutes turning cauliflower over half way. You can leave it to. I wanted more browning for more flavour.
   
 Should look like something like this.

Once veggies are done let cool.
Add the coconut milk to your blender or mixer, I used my vitamix. Then add the curry paste, salt, ketcap manis and the cauliflower.
Remove skins from onion and garlic and add them.
Blend till smooth and now add the mix to a pot with the veggie stock. Heat and serve. 
If your blender or mixer is big enough then add the stock at the same time as everything else. Mine didn't quite fit. If you are using a vitamix large enough to hold all the ingredients then of course just heat the soup up with it. Saves cleaning another pot. :) 

Another idea for this recipe could be not to add the veggie stock and use it as a pasta sauce, baked in a casserole or just poured on top. Yum! Next time for me. Enjoy! 

Health Benefits of Cauliflower :

Detox Support 

Antioxidant Benefits

Anti-inflammatory Benefits

Cardiovascular Support

Digestive Support


Thursday, 26 November 2015

Kale Chips


Kale chips are so easy to make and so expensive to buy. The recipes are endless. Any flavours go if you just have kale a little oil & the right temperature to cook them at. These are the ingredients I used.

Ingredients

6 large leaves of curly kale
2-3 tbsp olive oil
1/4 tsp salt
1 tsp garlic powder
1/4 cup nutritional yeast
**use organic when possible 

Method

Heat oven to 300F
Wash kale leaves and pat dry.
Tear large pieces off of each stem. Keep the small pieces too. Place into a bowl.
Add the oil and massage it with your hands into each kale piece then add the rest of the ingredients and mix till each piece is coated as evenly as possible.
Add the pieces onto two lightly greased baking sheets, making sure not to over lap.
If you have a convection oven then bake both sheets for 15 minutes turning half way.
If you don't have a convection oven then bake each sheet seperately on the middle rack for 15 minutes making sure still to turn at 1/2 way. 

I love making make chips. I've used other ingredients such as tahini, lemon juice, hemp seeds & the simplest as just oil and sea salt. As I mentioned before any ingredient goes. If you are a kale chip fan then I encourage you to try making your own and maybe even creating something no one has even done before. 
What's even more awesome about kale chips, is adding them to other meals. Meals like a sandwiches, burgers, crumbling them onto salads, pastas and pizzas. Yum!
However you choose to make them, may you be Nutritionally Well.

Friday, 20 November 2015

Coconut yogurt


My first attempt at making coconut yogurt.


 I don't make my own fermented foods as not to many in my family like them or want to eat enough of them so I just buy them, but I really wanted to give it a try. I figured if I was able to make small batches for just me or one of another kind that I knew someone else liked then I should give it a try. I have also done a small batch of veggies but they are not ready yet. If they turn out I'll probably post them out of excitement. :)

Through my studies which are a few years back now I came to learn about probiotics, fermentation and all the multitude of health benefits. I made sure to include them in my diet. When I started drinking kombucha and liking it lol. Gotta admit they all aren't great, but I do have several I like now. I really wanted to start making my own. When I over heard a conversation about someone giving kombucha a try by using a scoby from a friend and then getting really sick. I was done right there. Got me a bit spooked about messing around with bacteria. I thought I'd just leave it up to the professionals and I'd stick with buying these items.
However the thoughts kept creeping into my head to giving it a try.
Coconut yogurt was what I wanted to start with. So here the journey begins. At least I think, time will tell. :) 

 After doing lots of research, I learnt that full fat coconut milk is the way to go to receive a nice thick consistency, however I never use full fat coconut milk as there is enough fat in my diet. Good fat or bad fat, fat is fat and to much is never good. Don't want to consume my daily amount all in one meal, because then I'd have to make sure the rest of the day was fat free. No fun thanks. :) So I was determined to use the 72% less fat in this experiment. It turned out fantastic and I love it!. Yes it's runny and I'm completely fine with that. For me I feel like I am drinking kefir. Without the kefir of course. It's just the right amount of sourness too. It's all about ones preference in thickness, ingredients and technique. To be honest I kinda think this turning out was a huge fluke. I really didn't expect it to turn out! Especially on my first try. I'm thrilled it did. Two ingredients and 12 hrs later to yum!
It did take looking at several websites and learning about all the techniques and equipment for me to find what was simple and quick. Considering I thought about making this on the spur of the moment without any starter kits or equipment. I needed to be able to use what I had and that was what I used in this jar of coconut yogurt. 

The biggest concern for me was how would I know if my yogurt was safe to consume. My thoughts of course reflecting on the kombucha story. What signs to look for if it wasn't. After all I wasn't following any particular recipe and technique. I was kinda just taking a bit from a couple of websites. 
I spent most of my time researching this. After all we are wanting the health benefits not new health concerns.
See website for those helpful tips at the bottom of the blog. 
Here is the simple and easy recipe and technique I used.

Ingredients

1 can 72% less fat organic coconut milk
1 100 billion live cultures probiotic capsules ( you will find these in the refrigerated section in your health food store )
Yields 2 
Method

Turn oven light on
Wash and dry a 1/2 quart ( 1 pint ) mason jar and lid using clean hands and towels. Set aside
Open the can of coconut milk and pour it into a bowl 

Open the probiotic capsule up and add to the milk and whisk or stir till it's well incorporated

Pour into the jar and seal the lid on tight
Place the jar in the oven making sure the light is on and leave in for 12 hours
I made mine around 6:30 pm so it could sit all night. I chose this time because I knew for sure I wasn't going to be needing the oven. The longer it stays in the oven the more sour the taste will be. So set your time when it makes sense for you to be able taste the yogurt at about 8hrs. (8-12 hrs is the recommended time for this technique). If the taste is right for you then remove it from the oven at this point. If not then leave in till you think it's ready. 
Once ready remove from the oven and let the jar sit to cool at room temperature.
Place in the fridge and enjoy! 
I've been drinking a shot of this each day since I made it first thing when I wake up, but you could drizzle it over some fruit, cereal, oatmeal or even add it to your shakes or smoothed too. 

Another thing I'd like to say is I'm certainly no expert on making fermented foods as you now know, but I do know that the health benefits are huge when it comes to consuming fermented foods. Proper balance of bacteria in our gut is very important to our good health. It's amazing how probiotics cure many of our ailments that we think we need medication for. I do encourage you to read about the importance of probiotics if you are not familiar with them.
Here are a few sites to start you off. I also posted an article on the blog a few weeks ago. You can check that out under the "Articles" heading if you wish. 
    Probiotics are live bacteria and yeasts that are good for your health, especially your digestive system. We usually think of bacteria as something that causes diseases. But your body is full of bacteria, both good and bad. Probiotics are often called "good" or "helpful" bacteria because they help keep your gut healthy. 
    I hope if you choose to make your own fermented foods to do some research, take a class or purchase books to ensure you make the best out of all your efforts and time but especially learn to know the signs of contamination if it occurs. Don't be discouraged if it takes a few or several tries to get it done right. I do know my time is coming because this fluke may not happen twice. Even though I hope it does. :)  Mostly may you be Nutritionally Well. 

Thursday, 19 November 2015

Lentil Balls with Tomato Gravy

Pin It!


Like most meals I either plan ahead for the week or I just wing it. These last few weeks were definitely winged. Last night when I was thinking about what tomorrow's dinner was going to be all I thought was to soak the rest of my white & red lentils and then I'll figure the rest out in the morning. 
After I boiled the lentils I then opened the fridge to see what other ingredients I wanted to use so I can figure out what to make. So I just started adding my ingredients and now I'm making lentil balls. What I was serving the lentils balls with, I was faced again with no idea but I knew I'd figure it out later when I got home later that day. Talk about winging it. Sometimes it's a pain to just wing it but most of the time it's part of the fun in cooking for me. It makes my mind find its creative side. A few hours before dinner I thought about making a sauce. What kind now was again yet another question. So to the pantry and fridge I went again. Voilá, tomato gravy was made. I'm calling it gravy because of the thickness and colour otherwise it's pretty much tomato sauce !! :) 
Below you will find each recipe.

Lentil Ball 
Ingredients

2 cups of pre-soaked & cooked white & red lentils
1/2 cup red onion
1 cup of packed down spinach or a huge handful
1/4 cup red pepper
2 garlic cloves
1 tsp salt & pepper
1/4 cup chick pea flour
1 tsp curry powder
Plus 1/2 cup of coconut flour or one of your choice for coating
Oil for frying
**use organic when possible**
Yields about 18-20 pieces

Method 

Rinse the lentils under cold water really well
Place in a bowl with 3 times more the water then the lentils as they will double their size
Pre-soak lentils over night by either leaving them in the fridge or on the counter. I always leave mine on the counter
In the morning or when you are ready to start cooking. Drain and rinse the lentils really well
Boil lentils for about 30 minutes or till tender then drain and rinse
Measure 2 cups and place lentils in a large mixing bowl and 1/2 mash them
Refrigerate the rest and use in another recipe 
Finely chop the onion, pepper, spinach & garlic and add them the lentils
Add salt, pepper, curry & chick pea flour and mix really well
**Give it a taste test before the flour to see if you have enough salt. At this point add more if you wish 
Compact the mix by pressing down with your spoon, cover and refrigerate for a few hours. I left mine for about 4 hours 
When you are ready to make the balls remove the bowl from the fridge
Add flour to a bowl
Roll lentil mix into balls and then the flour. Making sure to shake off the excess flour to prevent the extra from burning in the pan
Heat a pan on medium-low heat. ( adjust heat if need be ) When pan is hot add your oil of choice. Approx 1-2 tbsp. Mine was coconut oil 
Once oil is hot, ( you can test that by flicking a little water into it. If it sizzles your oil is ready )
Drop how many pieces you like into the pan depending on the size of pan you use 
Cook for about 3-4 minutes per side or until golden brown. I even rolled them on their sides for extra crispiness & colour 
Once done place on a glass plate with a paper towel or napkin to remove excess oil
Repeat till all the pieces are cooked
Eat right away or store in the fridge for later or another day. I'd say no longer than 3 days in the fridge. Any longer than that I'd freeze them
 
  These are great served on their own with a dipping sauce or added to a meal. I think if there is any leftovers I might make some lettuce wraps with them. Yum! I love lettuce wraps. But for now these are going in the recipe below.


Tomato Gravy
Ingredients

1 796 ml can of diced tomatoes
2 garlic cloves
1 inch piece of ginger
1/2 small red onion 
1 tbsp turmeric powder
1 tbsp garam masala powder
1 tbsp curry powder
1/2 tsp red pepper flakes 
2 tbsp coconut sugar
1 tsp salt
1 tsp cumin
1/2 tsp cinnamon
2 tbsp kecap manis
1 1/2 cup plain almond milk ( or one of your choice. Coconut milk would have been my first choice but I was out :)
**use organic when possible
Yields about 5 cups

Method

Add all ingredients to a high speed blender. I used my vitamix. 
Place a pan on medium-high heat with about 1-2 tbsp oil of your choice. I used coconut oil.
Add the tomato gravy mix to the pan. Bring to almost a full boil then turn the heat down to low-medium to simmer. 
Let the mixture simmer for about 30-40 minutes while stirring often. This mix will reduce and thicken.
Once the gravy reaches the thickness you like, remove it from the heat.
Serve with the above previous recipe or with another of your choice.
If not using right away then store in the refrigerator or freeze and use for a later time.

Easy, delicious and very versatile. The best is a batch of sauce goes a long way. You can incorporate it into so many meals. 

 This is what was requested to go with these two recipes. Naan bread and basmati rice. (  Definitely not the paleo or gluten free option!!! ) 
However not everyone likes all my healthy choices in this house, so I have to comprise at times. :)

Hope you enjoy and may you be Nutritionally Well.


Thursday, 12 November 2015

Cream of Spinach

Pin It!


Cream of spinach like never before. I was craving cream of spinach and somehow artichokes came to mind. So together they came.

When you here the word cream we know it's loaded with unwanted fat, cholesterol and calories but you can certainly make a cream dish without all that. It's simple. Check out what makes this dish so creamy good.

Ingredients 

3 handfuls of spinach
2 cups loosely packed kale ( if you don't like kale or its texture just use more spinach )
1/4 cup chopped onion
6 1/4 pieces of artichoke hearts ( in oil or water, I used in oil )
3/4 cup unsweetened almond milk ( or one of your choice )
2 large cloves of garlic
1 tsp dried dill
1/2 tsp salt ( or salt to taste )
1/2 tbsp arrowroot powder ( or thickener of your choice )
*use organic when possible*
Yields approx 2 cups 

Method

Chop onion & kale
Add onion to a hot pan with a little oil and sauté till translutant, now add the kale and sauté for another few minutes till kale turns a bright green. Add approx 1-2 tbsp water and now add the spinach. Stir until spinach is wilted. 
Set aside
In a mixer ( I used my mini kitchen aide ) add artichokes, garlic, dill, milk, salt & thickener.
Blend till smooth. I ended up with a few chunks and that was fine too. 
Add the sauce mixture to the pan with spinach, kale & onion.
Mix well.
Cook over low to medium heat until it thickens. Voilá, done.


** tip-- if using the artichokes in oil, give each piece a squeeze to remove some of the oil. I love the flavour of them over the ones in water but I don't like all the extra oil.( up to you if you would Iike less or more oil ).

What I love about cooking and creating new recipes is the versatility of them. For instance I'm already thinking about if I was to take this same recipe and puréed it all after it was all done how wonderful it would be stuffed in some manicotti noodles or how about layered between some lasagna noodles. It would even stand on its own as a dip with your favourite veggies, crackers or bread. For paleo & pecatarian how about a sauce for your fish. Hmmmmm. Now I wished there were some left overs. Next time! However you serve this up, may you be Nutritionally Well.

Sweet and Salty Energy Bites

Pin It!


Ingredients

6 Medjool dates
1/2 cup Tamari almonds ( for paleo use plain almonds ) 
1/4 cup unsweetened shredded coconut
2 tbsp hemp seeds 
*Yields 12 pieces 

Method

Remove the pits from the dates and add all ingredients to a mixer and pulse till the mix becomes a crumble.
Roll into balls
You could also press the mix into a square dish and make granola bars too. I like the grab and go bites so this is why I rolled mine.

Nutritional and healthy facts on these ingredients.

Why dates?

When it comes to the number of minerals, vitamins, and health-benefiting phytonutrients in dates, suffice it to say there are a lot of them. First and foremost, they're easily digested, allowing your body to make full use of their goodness

Why almonds?

Almonds are among the lowest-calorie nuts. Per one-ounce serving, almonds are tied with cashews and pistachios at 160 calories. They also have more calcium than any other nut, plus nearly 9 grams of heart-healthy monounsaturated fats, 6 grams of protein, and 3.5 grams of fiber per ounce.

Why hemp seeds?

These little seeds give you the complete nutritional power of hemp with their blend of omega-3 and omega-6 fats, high fiber content, and quality amino acid profile. Hemp seeds are also high in magnesium, a mineral that helps with relaxation, blood sugar control, blood pressure, and potentially osteoporosis, and that is generally low in women. Three tablespoons of hulled hemp seeds gives you 10 grams (g) of protein, 14g fat (mostly coming from omega-3 and omega-6 fats), and 2g fiber.

Why coconut?

Native to the tropics, coconut is used to make several nutritious foods and beverages, from electrolyte-rich coconut water to zinc-rich coconut meat. At 187 calories per ounce, dehydrated, shredded coconut -- also called dessicated coconut -- provides you with energy to get you through the day. Dehydrated, shredded coconut makes for a healthful addition to your diet, because it helps maintain healthy tissue and fights disease.


A healthy and nutritional protein loaded snack to be enjoyed from adults to the kids. Wholesome ingredients and no sugar added.  Hope you enjoy and may you be Nutritionally Well.


Saturday, 29 August 2015

Pan Fried Deluxe Mashed Potatoes

Pin It!


When I woke up this morning I was thinking just what I would be making for dinner tonight. Yes I know my brain starts as soon as I get up. I start first with "what's for dinner" ( unless I know I'm going out ) then lunch then breakfast. I envisioned a veggie loaf or veggie nuggets for tonight. I started with making the potato mash and let that sit until it was closer to dinner time to figure out the rest. At that time I started grating & chopping and started adding spices till my taste buds were satisfied. Being that I try to keep my meals very low to no cholesterol & calorie conscience, I know that cheese & eggs are not the answer, which we rarely eat now. I also knew I didn't want to add flax eggs or panko bread crumbs at this point as I would have to adjust my spices to make up for their blandness. So pan fried potato mash it became. Here is the recipe I came up with today.

Ingredients 

3 russet potatoes
4 cloves of garlic
1/2 small white onion
------
2 cups spinach
1 carrot 
1 whole roasted red pepper
1/2 tsp dried oregano 
1/2 tsp dried thyme
2 tbsp nutritional yeast ( red star ) 
1 tbsp broccoli seed powder ( optional )
Salt & pepper to taste ( be generous )
** use organic when possible **
For you spicy lovers add some hot peppers, hot sauce or flakes to satisfy your palettes :)  

Method

Peel and chop potatoes, peel garlic & roughly chop onion, add those to a pot a boiling water and cook till tender.
While these are cooking, chop spinach, grate carrot & diced the roasted red pepper ( homemade or jarred are both fine, just make sure with jarred to squeeze out the liquid before chopping ) and place in a bowl.
Drain potato mix and either hand mash or use a mixer and mix till creamy smooth.
Add potato mix to the bowl of other veggies & seasonings and mix with a spoon till its all well incorporated. Give it a taste test. Add more seasoning at this point if need be.

Heat a cast iron pan or a pan of your choice to med/high heat with a couple of tbsp's of canola oil. Once oil is hot add the entire potato mix to the pan and flatten mix to fit the perimeter of the pan. Allow about 5 minutes before the first turn to get the first char, then turn, flip and spread out as many times as you like till you are satisfied. Quick note is every time you flip the char will mix and soften, but that's ok as this is adding all the char flavour. I kept the last flip to be the top of the serving dish for a little crunch and to add to the presentation. 
Serve and enjoy

 I think this dish sounds more like a great use for left overs, and yes it would be but nope this recipe is a thought that wasn't thought through but tasted sooooo good. Sometimes these dishes are simply the best which is why I'm posting it. Lately my brain isn't working in my creative favour. I find myself blogging less due to this. Maybe once the school year restarts my brain will too and my thoughts will again flow and begin to be more creative. 

Now for how I ended up serving this mash, was up along side a huge salad full of dark leafy greens, nuts, seeds & fruit. Not a meal I would serve if guests were here as they may feel they need more, but for my husband & I it was a nice lite, simple & perfect meal. 
Now if there were any left overs here, I would maybe add this potato mix with more spices such as curry or masala with peas wrapped in phyllo pastry and make samosas. Mmmmm !! Next time :)
If you give this recipe a try, I hope you enjoy and feel free to switch up any veggie or spices to make it your own but mostly may you be Nutritionally Well.

Monday, 10 August 2015

Dairy Free Garlic Butter

Pin It!


I came across a Bobby Flay show the other day and he was making what he calls a garlic whip. He didn't give any measurements but that's ok just the ingredients alone is all I needed. I mean how hard was it going to be to mess this up? It is so easy and so simple to make and mostly absolutely the best creation. It becomes one of those questions you ask yourself " why didn't I think of this ". 
Being that this is dairy free means no saturated fat or cholesterol just  plain ol' wholesome ingredients that offer many health benefits.
With just three ingredients you could make this amazing butter too without even considering buying the store bought stuff again. 
These are the measurements I used. 

Ingredients

2 heads of garlic
2 tbsp EVOO
1 tsp fresh squeezed lemon juice
Salt ( optional )

Method
Peel the garlic & cut them up a bit for better blending. Place into your mixer with the oil & lemon juice. Pulse a couple of times to start the blending. Scrape down the sides and repeat till it's puréed. 
This butter can be added to so many dishes & meals. For example you could spread it on some bread to make garlic toast, use as a sandwich spread, pizza base, mixed in for garlic mashed potatoes or garlic mashed cauliflower, drizzled over some veggies, added to a salad dressing or do what bobby flay did and rub it on some cobs of corn. 
I'm truly so excited to have stumbled across this clever idea. It's going to be a new staple in my house
**Here's a short list & website on the health benefits you are getting when choosing these ingredients.


Health benefits of Garlic:

Cardiovascular Benefits

Anti-Inflammatory Benefits Across Body Systems

Antibacterial and Antiviral Benefits

Cancer Prevention

Garlic - The World's Healthiest Foods

www.whfoods.com/genpage.php/genpage.php?tname=foodspice&dbid...
You can increase the health benefits you receive from garlic by letting it sit after ... However, if you cannot tolerate raw garlic, you can add chopped garlic to ...


Health benefits of EVOO:

Cognitive Benefits

Bone Health Benefits

Anti-Cancer Benefits

Digestive Health Benefits

Cardiovascular Benefits

oil, extra virgin - The World's Healthiest Foods

whfoods.org/genpage.php?tname=foodspice&dbid=132
What's New and Beneficial about Extra Virgin Olive Oil. The quality of olive oil production—especially the stage of pressing—really does make a difference when it comes to health benefits. Mediterranean Diet studies have long associated olive oil intake with decreased risk of heart disease.


However you choose to use this butter, enjoy and mostly may you be Nutritionally Well.


Thursday, 6 August 2015

Raspberry Soft Serve

Pin It!


Sometimes the simplest things in life are the best. Just like in this sweet soft serve nice cream.

Ingredients

1 cup fresh raspberries
1 cup frozen bananas ( approx 1 banana )
** use organic when possible**

Method 

Purée using a high speed blender like a vitamix. Add the raspberries first then the banana. Enjoy as is or top it with some superfoods like hemp seeds, chia seeds, any nut and other fruits.

How about knowing how much just these two ingredients can improve your health. Take a peek at the websites provided below to see what raspberries & bananas both offer us.

Health Benefits of Raspberries


Antioxidant and Anti-Inflammatory Benefits

Obesity and Blood Sugar Benefits

Anti-Cancer Benefits


Raspberries - The World's Healthiest Foods

www.whfoods.com/genpage.php?tname=foodspice&dbid=39
Anti-cancer benefits of raspberries have long been attributed to their antioxidant and ... Health Benefits; Description; History; How to Select and Store; Tips for ...

What are the health benefits of raspberries? - Medical News Today

www.medicalnewstoday.com/articles/283018.php
 Rating: 4.3 - 12 votes
Oct 3, 2014 - Find out about the health benefits of raspberries including improving memory, lowering the risk of death from cardiovascular disease and ...

Health Benefits of bananas


Cardiovascular Health

Digestive Benefits

Athletic performance


Bananas - The World's Healthiest Foods

www.whfoods.com/genpage.php/genpage.php?tname=foodspice&dbid...
Health Benefits. Creamy, rich, and sweet, bananas are a favorite food for everyone from infants to elders. They could not be more convenient to enjoy, and they ...

Bananas: Health Benefits, Risks and Nutritional Facts - Medical ...

www.medicalnewstoday.com/articles/271157.php
 Rating: 3.6 - 109 votes
May 26, 2015 - This article will take a look at the potential health benefits of bananas, such as lowering the risks of cancer and asthma, lowering blood ...
You've visited this page 3 times. Last visit: 16/04/15


Monday, 13 July 2015

Berry Sorbet

Pin It!

Sugar, dairy & fat free sorbet


Nothing like cold treats on hot summers days. Ice cream still seems to be a favourite for most and with that can come tons of fat, sugar & empty calories. Making sorbets & ice cream at home can save you on all those unwanted extras just by using fruit. The bonus is that not only does fruit contain essential vitamins & mineral they also offers so many health benefits. See at bottom of blog for these details. 
For now here's the skinny on this recipe 

Ingredients:
2 Cups frozen mixed berries
1 Cup frozen pineapple
1 medium to large banana

Method:
Add all the ingredients to your high speed blender ( I use my Vitamix ) 
Blend till creamy smooth. If you prefer a chunky texture then of course decrease blending time
Enjoy!

Canada's Food Guide suggests 7-8 servings of fruit & vegetables combined per day. With this sorbet you are getting 7 servings of it in just fruit alone. See how to calculate it below.

  • 125 mL (½ cup) fresh, frozen or canned 
    vegetable or fruit or 100% juice
  • 250 mL (1 cup) leafy raw vegetables or
    salad
  • 1 piece of fruit

Health Benefits of eating fruit


Fruit Nutrition

Fresh or frozen, fruit is one of Mother Nature’s most amazing foods! Here’s why it’s important to add more fruit to your diet:

  • Most fruits are naturally low in calories, sodium and fat – with zero cholesterol!
  • Fruits provide many essential nutrients that we need more of, including:
    • Potassium – Important to help combat high blood pressure, a risk factor for heart disease. May also reduce the risk of developing kidney stones and help to decrease bone loss.
    • Dietary fiber – Important to help reduce blood cholesterol levels and may lower risk of heart disease, obesity and type 2 diabetes. Also important for proper bowel function.
    • Vitamin C – Important for growth and repair of all body tissues and keeps teeth and gums healthy. Provides antioxidant defense against infection and disease.
    • Folate (folic acid) – Helps the body form red blood cells and helps reduce the risk of birth defects.
  • Fiber-rich fruit satisfies your hunger with fewer calories, helping you to maintain a healthy body weight.
  • Fruits are a source of phytonutrients or compounds that naturally occur only in plants and are associated with a wide range of potential health benefits. Phytonutrients work synergistically with the vitamins, minerals and fiber in whole fruits to help reduce disease risk. ( wymans.com )
Hope you create some delicious sorbets & ice cream this summer. It will be a treat everyone looks forwards too. Happy making & May you be Nutritionally Well.